Shower Plumbing – avoid last minute panic
Shower Plumbing – avoid last minute panic
If you’re embarking on a bathroom remodel, you might think you have plenty of time to choose your shower fixtures before installing shower plumbing.
Let me put this plainly: you don’t.
Plumbing is installed in your home in two phases. The first phase is the “rough in.” That’s when the plumber runs all the piping and drains, and also when they install the valves needed for your shower, tub, and sink systems. This usually happens right after your contractor finishes framing up the walls. No big deal, except for the fact that *each brand has its own valve* and if you don’t have the valves chosen and ready, you have now added time (and therefore probably money) to your remodel. Boo.
So let’s talk plumbing from top to bottom so you don’t find yourself picking it out in a panic.
Parts of a shower system: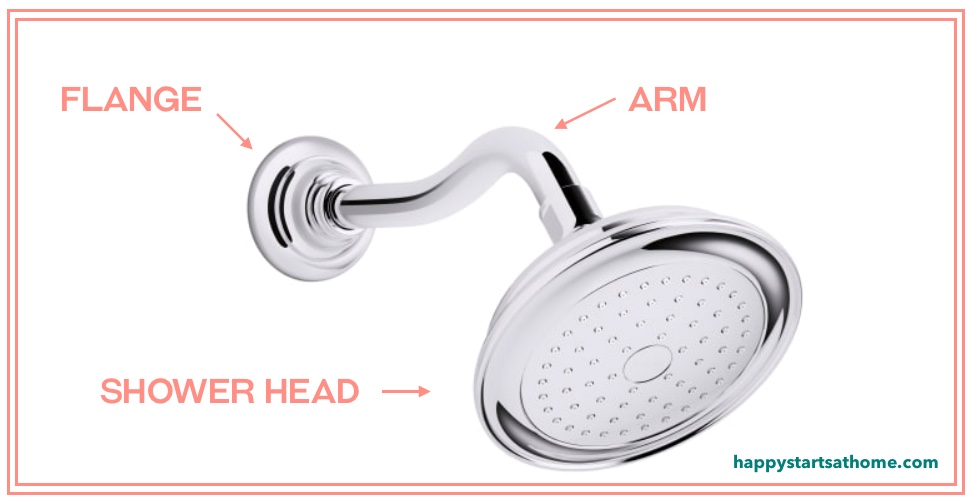
1) shower head, arm, and flange (the arm holds the shower head out from the wall, and the flange covers the hole in the wall):
What you choose will depend on the style of your bathroom, and on what kind of water flow you like (high intensity? multi-function? rain shower?). You can have a fixed shower head, a ceiling-mounted rain shower, or a handheld – they all serve the purpose of putting water on your body.
2) shower trim and valve This is the part that turns the water on and off. This can be a simple system, or a more complicated system with separate volume and temperature controls.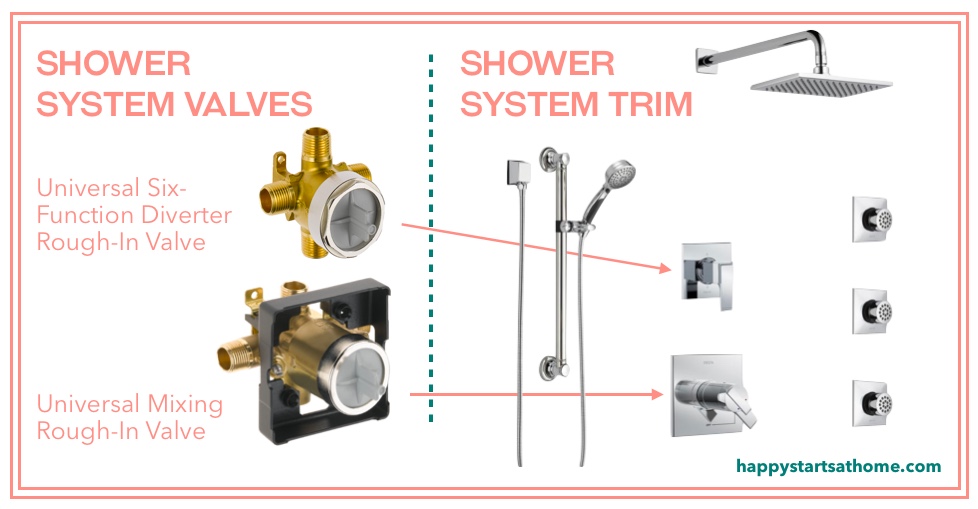
The simplest systems are called “pressure-balanced.” In a pressure-balanced system the valve (also called a “mixing valve” because it literally mixes the hot and cold water) provides water at a nearly constant temperature to a shower or tub, even if there is a fluctuation in the hot or cold supply (like if someone flushes the toilet).
With a pressure-balanced system you have one handle, and it both turns on the shower, and controls your temperature. You have control over your temperature, but the amount of water will be the same whether you turn the handle a little, or a lot.
You can also choose a “thermostatic” system, and then you’ll have two handles – one controls the volume of water, the other controls the temperature. This lets you set-and-forget your temperature, and you can just slam on the water after you stumble out of bed for your perfect morning shower. (This works great if you are the only person using your shower, but if you share your shower, and you’re like me and my hubby, you’ll probably have to adjust the temperature each time anyway because you’ll have different temperature preferences.)
That’s not the only benefit to a thermostatic system, though – it’s an important feature if you have a fancy system with body sprays and such, and here is a fantastic description of the differences between pressure-balanced and thermostatic systems by the folks at Quality Bath.
Speaking of fancier systems, once you have more than one shower head (for example, you also have a handheld shower head, or some body sprays) you’ll need something to control where the water sprays from, i.e., you need a “diverter.”
3) Diverter trim and valve This is the part that determines which shower head (or body spray) your water comes out of. How complex your shower system is will determine how many diverter settings you need. A simple system might just divert the water from a fixed shower head to a handheld shower, or from a tub filler to a shower head.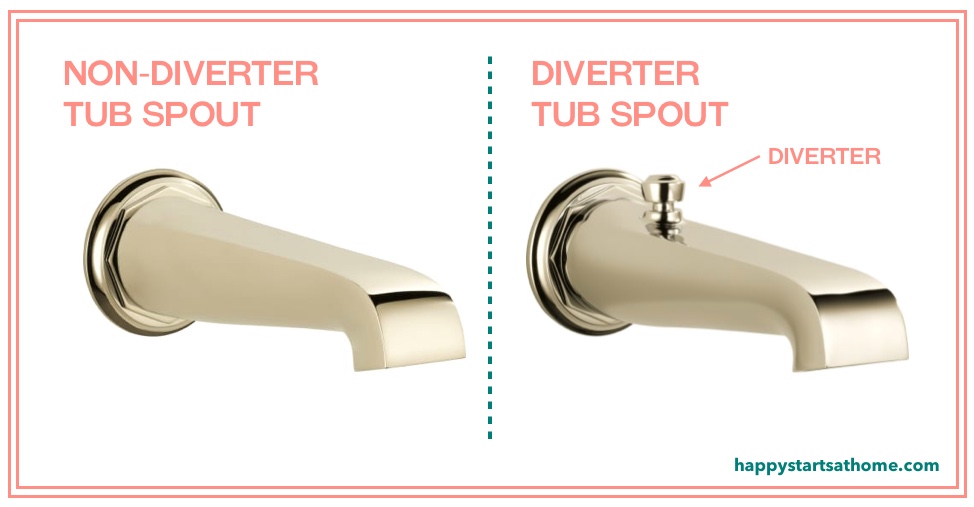
On the other hand, a six-function diverter like the one shown below means you can have the water come out of 1) the fixed shower head only, 2) the body sprays only, 3) the hand shower only, 4) *both* the fixed shower head *and* the hand shower, 5) *both* the fixed shower head *and* the body sprays, or 6) *both* the hand shower *and* the body sprays. Talk about luxury!
Important! Note that while the description says “universal” valve, it is universal only *within* each brand. That means that you can use a universal *Delta* valve with any of the *Delta* trims, but you can’t use it for a Moen or Kohler trim, or any other brand for that matter. You’ll need a universal valve specific to the trim brand you choose.
4) tub filler If you have a tub/shower combination, you need to have a tub spout, too. Some of these will have a diverter built in (the little piece of metal you pull to make the water stop coming out of the spout and instead come out of the shower) and others will not have a built-in diverter, and the water flow will be determined by your wall-mounted diverter valve.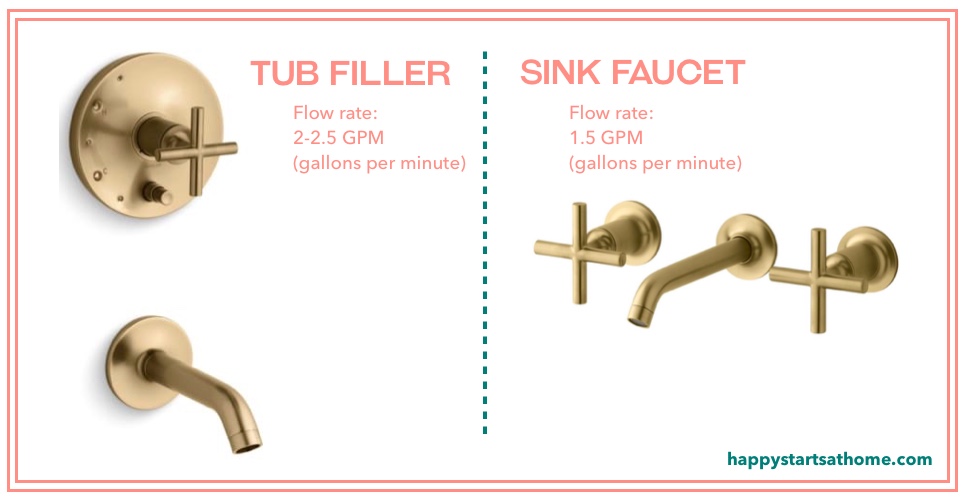
Watch out!
If you want a wall-mounted tub filler don’t mistakenly choose a wall mounted *sink* faucet. They may look similar but the water flow rate can be very different. It would take an annoyingly long time to fill a tub from a sink faucet.
Helpful hint – there are *very* few double-handle tub fillers on the market these days, so if you see two handles, you are probably looking at a sink faucet. But check the flow-rate in the specifications to be 100% sure.
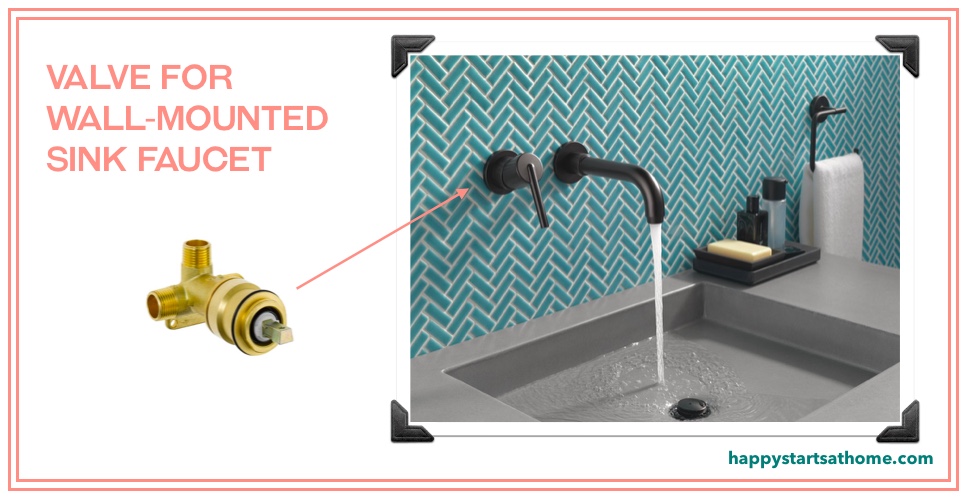
BONUS tip: Want a wall-mounted sink faucet?
Standard sink faucets that are mounted on your counter do not need a valve, but if you are going with a wall-mounted faucet it just like a tiny shower system and will need a valve too. Make sure it’s on hand when your plumber is ready to rough-in the plumbing.
WARNING!
If you’re shopping online it can be easy to miss all the plumbing parts you need and find yourself in a bind during your remodel. Some sites make it pretty easy to make sure you have all the parts you need. They indicate right on the page if a valve is required and whether or not it is included, and after you add the fixture to your cart, they usually take you directly to a page to add the valve to your cart, too. Other sites don’t make it as obvious. For example, if you want to get the Delta Trinsic wall-mounted sink faucet shown above and shop for it on Wayfair, you’ll need to be savvy enough to know that you need a valve, and dig for it. On the other hand, if were to shop for it on a site like FaucetDirect.com they make the process much simpler and more obvious.
Let’s sum all this up.
1) You need a place for water to exit (shower heads, tub spouts, or body sprays) and any needed connectors (like arms, flanges, or hoses).
2) You need an on-off control, *with* a valve.
3) And if you have more than one water exit, you need a diverter *with* it’s associated valve.
So, while your contractor may not install your shower trim (the pretty parts) until phase two, several weeks after they demo your bathroom, they’ll need those valves just a few days after they start your project. Have your trim and valves onsite by the time they start and you’ll avoid making a selection in a hurried panic (never a great way to design) and you won’t cause any embarrassing – or costly – delays.
May your home (and your bath remodel experience) always be happy!

More Advice for your Seriously Happy Home


Eager to get happy at home right now?
Get 10 tips for a happier home!

HI, I'M REBECCA WEST! I’m the founder of Seriously Happy Homes, the author of Happy Starts at Home, and a business coach for residential interior designers.
I believe our homes have a huge impact on our happiness and well-being, but I don’t care if you buy a new sofa or remodel your kitchen. I just care that your home supports your goals and feels like “you.”
May your home always make you happy! 