A Bright Idea: Instant Dining Updates for all budgets!
A Bright Idea: Instant Dining Updates for all budgets!
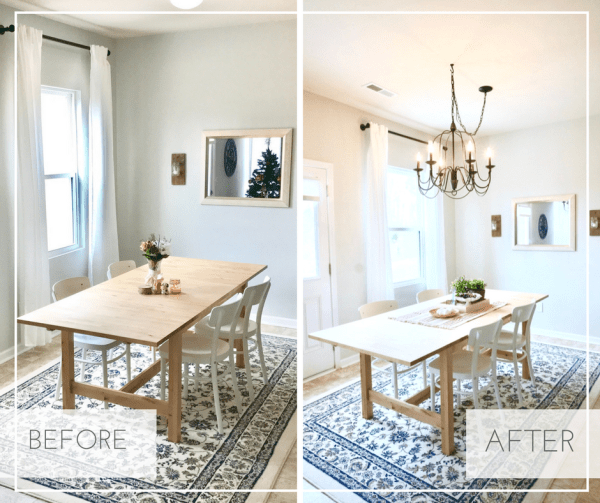
Need to freshen up your dining space but not ready for a big remodel? No problem! We have ideas for dining updates… Just change out your light fixture and create a new look in no time! It’s a quick and easy change, where the most difficult part will probably be choosing the fixture because there are so many awesome options to choose from!
How to choose?
It’s easy to get overwhelmed by all the options, so always start with the big picture. Go on Houzz or Pinterest and (*without over-thinking it*) pin ten dining rooms that you could totally see yourself having dinner in. Note that I said dining *rooms* not dining room “light fixtures.” That is because you need to see things in context. (However, do try to choose images that actually show a light fixture).
Once you choose ten rooms you love, then look at the ten images as thumbnails (so you can see them all at the same time) and see what they have in common. Are you drawn to traditional motifs? Modern fixtures? More circular or more linear designs? Bright and shiny chrome, light and soft brushed nickel, warm antique gold, or deep, rich bronze? I can almost guarantee you’ll find a common thread in your selections, and that is the first place to start to narrow down your search.
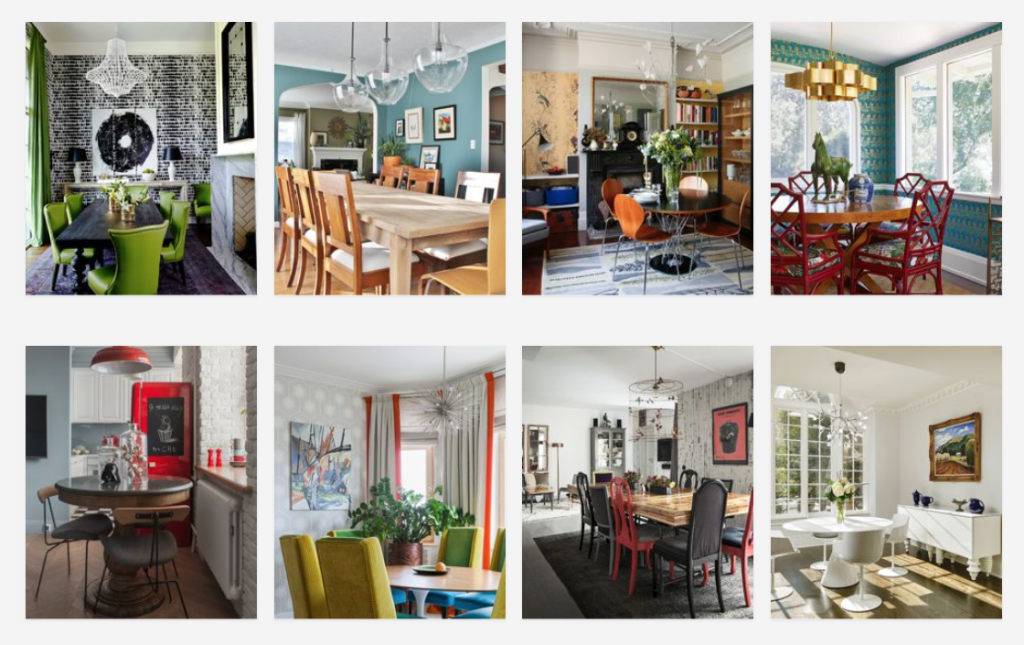
For example, the ideabook above shows us that this person loves an eclectic, casual style and that the light fixture will need to be visually interesting and probably have some curves or movement – nothing too linear for this homeowner. The room has to have a pop of color, too, and that could come from the light fixture, or the walls.
What to spend
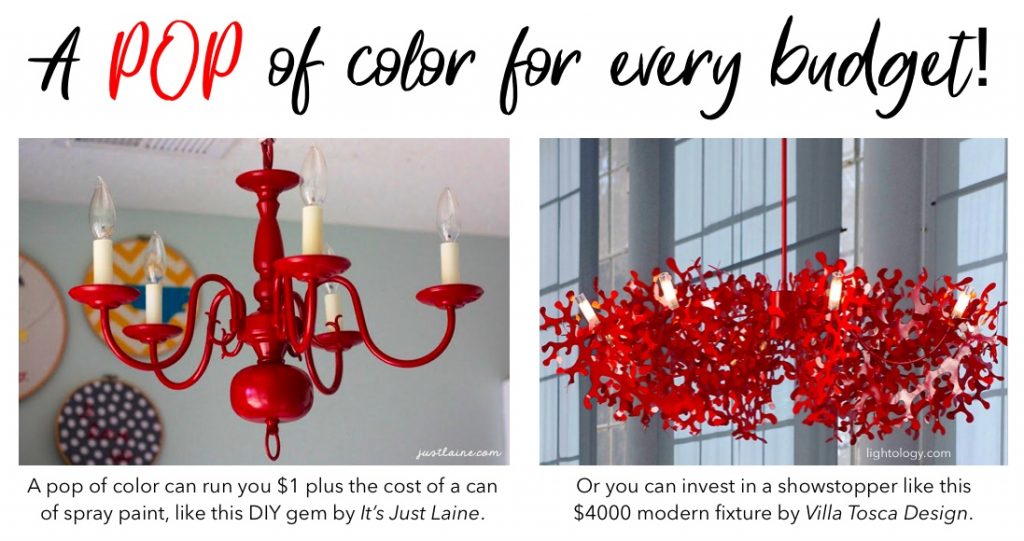
Of course, budget is a great way to narrow down the options, too, and you are in complete control of what you decide to spend on your new (or repurposed) fixture. Set your budget somewhere between a $1 (okay, so she also had to buy the spray paint, but still) and $16,000 or more (wow) and go from there.
Where to shop?
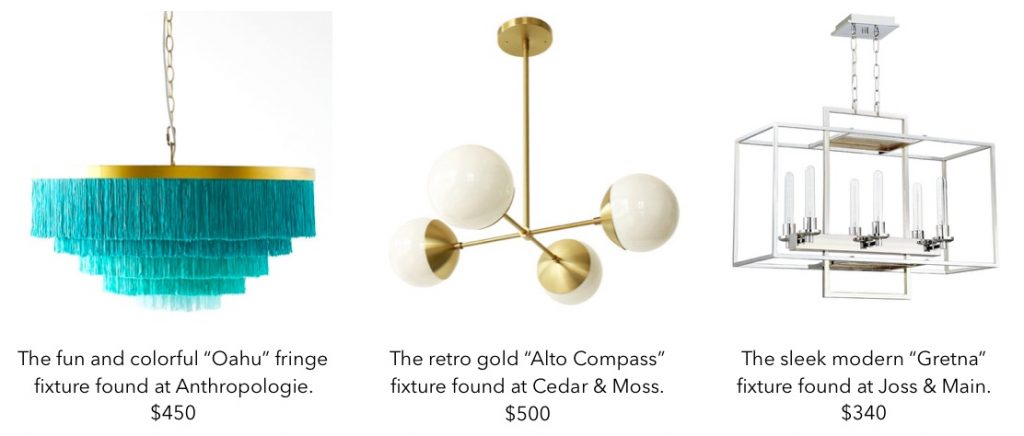
Three of our favorite sources to find lighting are Lamps Plus, Seattle Lighting, and North Coast Lighting because they have searchable online shopping, local showrooms, and thousands of options, but there are outstanding northwest-based specialty shops like Harolds, Luxe Lighting, and Cedar & Moss, as well as stores that may not specialize in lighting but have fantastic selections, like Anthropologie, West Elm, Pottery Barn, and Room and Board.
What size to get?
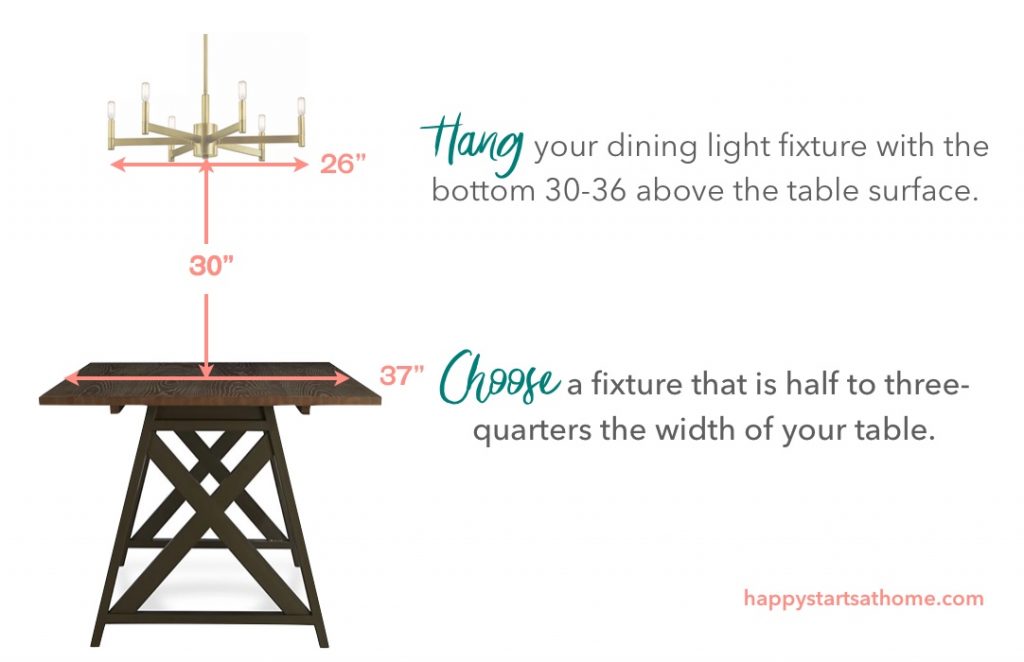
Measure the width of your dining table and aim for a lighting fixture that is one-half to three- quarters of its width. This works as a guideline for both length and width, actually, so if you have an especially long, skinny table, you may want to look for a linear style light, or even hang two or three independent lights like the folks at JTW Design did to fill the space featured below:
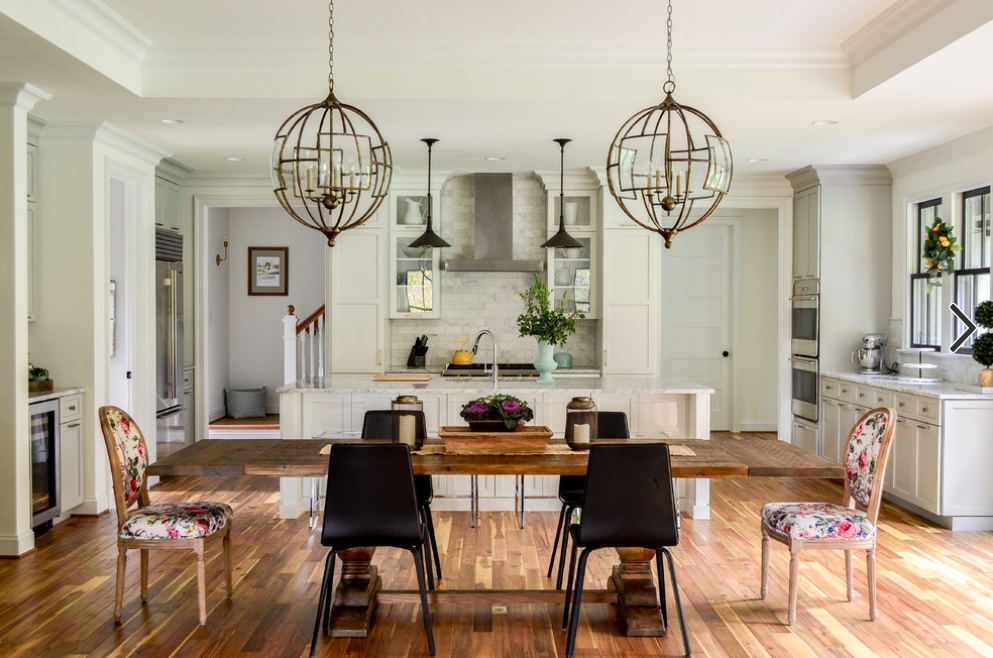
Even though those light fixtures are large, dramatic statement pieces, the table is so long that just one wouldn’t have been enough. Notice too how high these are hung in the space (see below for info on ideal hanging heights) and remember that all design “rules” are just guidelines.
Please DO make sure your light is centered over your table. If your junction box isn’t in the right location for where you want your table, don’t be afraid to swag the new light like Briana showcased on her “Try Everything” blog – just be sure to choose a chain-hung fixture if you want it to be a quick and simple to reposition the light.
How high to hang it?
Typically the bottom of your fixture should be about 30” above the table, but the exact height will depend on the fixture, the furnishings, and the room, and may be installed 32”, 34”, or more above the table height. Most fixtures have adjustable chains and cords to give you flexibility in the hanging height, and the specifications will list the minimum and maximum length for any given fixture. Use 30-36” above the table as a guide, then have someone hold it above your table before installing to get the height just right. Remember, just like when cutting hair, it’s easier to shorten a fixture than to lengthen it, so err on the side of too low.
How to install it?
If you are adding fixture, or turning a single light source into a multi-pendant installation, you’re probably going to need to hire a reputable electrician or handyman to do the job. However, assuming you are just swapping out a fixture where your current light is located, this is a totally appropriate DIY project!
Before you do anything –
SAFETY REMINDERS:
WHEN WORKING WITH ELECTRICITY, ALWAYS TURN OFF YOUR BREAKER!
WHEN STANDING ON A LADDER OR WORKING OVER STAIRS, HAVE A HELPER ON HAND TO KEEP YOU STABLE AND HAND YOU TOOLS!
And {disclaimer} – we’re are not electricians, so always read and follow the lighting manufacturer instructions. 😀
First, verify that the the breaker is off and then remove any globes and bulbs from your old fixture. Remove the cover plate over the junction box (the junction box is the part in the ceiling that holds the wires and to which you screw the hanging mechanism and cover plate). Have your helper hold the light fixture while the other person disconnects the electrical wires. Some of those light fixtures can get heavy!
SAFETY NOTE:
Never let a lighting fixture hang by its wires! It may seem well-attached, but you don’t want to have that fixture crash to the ground!
Before installing the new fixture, check to verify that the existing junction box is firmly secured before moving on to connecting the new fixture. If it is not, tighten the fasteners. (Also, to avoid breakage, do not place light bulbs in the fixture until it has been fully installed.)
Next, adjust the hanging chain or cord length for your desired hanging height. As mentioned, to get the height just right you may need to have your helper hold up the fixture while you stand back to evaluate the height.
Then, while your helper holds the light fixture (again, never let a fixture hang by its wires! Trust me, this is better with two people!) connect the wires and secure your new fixture. Check the instruction, but usually this just involves securing three pairs of wires with wire nuts (they look like little plastic dunce caps) then cramming them all into the junction box. You will also want to connect the grounding wire securely to the grounding bar in the junction box (important!).
You’re almost finished. Fasten the bolts to the attachment points as indicated in the manufacturer instructions (now your fixture can hold itself up and your helper can get some blood flow back in their arms), then attach the canopy (that’s the decorative cover that hides all those wires inside the ceiling).
Want more info? Here is a helpful posts from build.com that gives more detail of how to change a light fixture: How to Replace and Install a Chandelier
Now you are all set to transform your space with a simple lighting fix!
May your home always be LIGHT AND happy!

More Advice for your Seriously Happy Home


Eager to get happy at home right now?
Get 10 tips for a happier home!

HI, I'M REBECCA WEST! I’m the founder of Seriously Happy Homes, the author of Happy Starts at Home, and a business coach for residential interior designers.
I believe our homes have a huge impact on our happiness and well-being, but I don’t care if you buy a new sofa or remodel your kitchen. I just care that your home supports your goals and feels like “you.”
May your home always make you happy! 